

This post contains affiliate links.

Homemade kombucha starts with a SCOBY, sweet tea, and patience. Brew the first ferment for 7 to 10 days until it tastes tangy, then bottle it with fruit or juice for a second ferment that builds natural carbonation.
I’ve been brewing kombucha since before I started this site, long enough that I keep two SCOBYs going now in case one batch goes sideways. My kombucha site, Brew Buch, exists because people kept asking the same troubleshooting questions in the comments here, so if your batch smells like vinegar or your SCOBY looks strange, I’ve almost certainly seen it before.
Brewing kombucha at home comes down to patience and a few non-negotiables: clean equipment, the right ratio of starter tea, and resisting the urge to peek on day three. I’ve run this recipe through dozens of batches to land on a fermentation that’s reliably tangy without tipping into straight vinegar.

 save this recipe!
It’s a big day everyone! The day your intestinal microbiota have been begging you for. The day you say goodbye to expensive store-bought kombucha. The day you become a brewmaster!
The goal of this guide is to be your one stop shop for homemade kombucha brewage, from SCOBY-less to fermented perfection. No hopping around the internet or buying unnecessary gear. No fuss. No confusion. Because making homemade kombucha is so simple, and I hope after reading this you’ll give it a whirl! Let’s hop right to it.

Meet The Brewer
Hey friends, I’m Sarah! I’m in love with home-brewing kombucha and have helped thousands of people all over the world make kombucha in their homes! I created an entire website dedicated to brewing kombucha called Brew Buch, and run an online community of over 50,000 brewers called Kickass Kombucha Brewers (I’d love for you to join)! If you have any questions about brewing, please drop a comment at the end of this post – I personally read and respond to them daily!
What is Homemade Kombucha?
Kombucha is a fermented tea drink made by adding a SCOBY (symbiotic culture of bacteria and yeast) to sweetened tea and letting it ferment for one to three weeks.
During fermentation, the SCOBY consumes most of the sugar and produces a naturally fizzy, tangy drink with a small amount of alcohol (typically less than 0.5%, similar to ripe fruit juice). The result is a lightly effervescent beverage that tastes somewhere between sparkling apple cider and tart lemonade, depending on how long it ferments and what flavorings you add.
Homemade kombucha goes through two stages. The first fermentation produces the base kombucha. The second fermentation, done in sealed bottles with added fruit or juice, builds the carbonation and adds flavor. Both are simple once you know what you’re doing!
What You Will Love About This Kombucha Recipe
I’ve been brewing kombucha at home for years, and this guide has now helped over 100,000 home brewers do the same. Here’s why it works and why readers keep coming back to it:
- Written for complete beginners with no brewing experience required
- Covers everything from growing your own SCOBY to second fermentation and flavor variations in one place
- Fully customizable! Once you have the base down, the flavor combinations are endless
How to Brew Kombucha:
This post will go into detail about each step in the process of making kombucha. For succinct instructions and metric measurements, jump to the printable recipe card at the end of this post. The general order of things goes something like this (you can jump around this tutorial by clicking the links below):
- Make SCOBY (1 to 4 weeks) – to make the “mother”
- First Fermentation (6 to 10 days) – to make the actual kombucha
- Second Fermentation (3 to 10 days) – to carbonate the kombucha

“Excellent recipe. I’ve tried ten or more online for comparison and this one has the best flavor balance. Not at all vinegary and not too sweet. Will be using for my base from now on.” -Katherine
Before we start, here are some general notes that are consistent throughout the whole homemade kombucha process.
- No metal or plastic containers. Metal can react with the acidic kombucha, while plastic can house nasty bacteria.
- Clean is key. A recurring theme in kombucha brewing is that everything must be clean! We’re creating the perfect environment for good bacterial growth, but if a bad bacteria sneaks in it could ruin your batch (and make you pretty sick).
- Temperature plays a big role. Fermentation goes a bit quicker in warmer temperatures and a bit slower in colder.
- No mold zone. If you see any mold growing on your SCOBY or in the tea (which I understand can be difficult to discern from the hideous SCOBY but will generally be green, white, or black), then toss your whole batch.
Supplies Needed for Making Kombucha
- Large Glass Jug: It should hold at least 1 gallon (buy on Amazon or in most homeware stores)
- Fermentation Bottles: These bottles have a tight seal specifically designed to keep the carbonation in (hellooo fizz!) (buy flip-top bottles here or collect and reuse GT’s bottles)
- A breathable cloth cover. A clean cotton cloth, coffee filter, or paper towel secured with a rubber band keeps dust and insects out while allowing airflow. The SCOBY needs oxygen during first fermentation.
- A long-handled wooden or plastic spoon. Avoid metal utensils in contact with the SCOBY or kombucha.
- A fine mesh strainer or cheesecloth. For straining before bottling.


Step 1: How to make a kombucha SCOBY
The SCOBY (symbiotic culture of bacteria and yeast) is the mother of the kombucha, providing bacteria and yeast to ferment the sweet tea, protecting the tea from outside contaminants, and providing a loose seal to keep a bit of the carbonation in. Yes, it’s hideous…but it’s the very essence of kombucha! And the best part? You can make one at home! You’ll need:
- Water: Tap water is just fine here!
- White Sugar: Feeds the yeast and bacteria—don’t sub with other sweeteners.
- Black Tea: Provides nutrients for fermentation. Black tea works best for a strong, healthy SCOBY.
- Raw, unflavored kombucha: Contains live cultures that kickstart the SCOBY growth. Look for one with sediment at the bottom!
To make a SCOBY, you’ll brew sweet black tea, let it cool, then mix in raw kombucha. Cover and ferment at room temperature for 1 to 4 weeks until a ¼-inch SCOBY forms. Keep the SCOBY in its tea until you’re ready to brew your first batch! Jump to recipe for printable instructions.

Which brand Is best?
Our tried and tested store-bought brand is the GT’s “Pure”. You can find it in most natural food stores.

Important Notes For Making A SCOBY
- Only black tea. Similarly, the SCOBY doesn’t grow as well with green or fruity teas. By all means, once your SCOBY is big and strong, you can use green tea, but for now, stick with black. The SCOBY doesn’t like decaf tea and will not grow as well if fed it (SCOBY = my spirit animal).
- No honey. Honey can contain botulism bacteria that, when grown exponentially as bacteria and yeast tend to do in kombucha, can be dangerous.
- Don’t mess with it! You won’t see anything but a few bubbles in the first few days. But then one day a thin, translucent layer will form, eventually thickening into a full on SCOBY.
SCOBY Care
A healthy SCOBY is pale, rubbery, and floats somewhere between the top and bottom of the jar. Brown stringy bits hanging off the bottom are yeast strands, not mold, and are completely normal. Mold shows up as fuzzy spots on the surface, usually blue, black, or white, and if you see it, the whole batch needs to be tossed.
Store your SCOBY in a “SCOBY hotel,” a jar with a cup or two of finished kombucha, whenever you’re not brewing. Keep it out of direct sunlight and covered with a breathable cloth, never a tight lid.

Step 2: The first fermentation
Steep the tea, dissolve in the sugar, and let it cool completely to room temperature before adding your SCOBY and starter liquid. Adding either to hot tea can kill the culture. Cover the jar with a breathable cloth secured with a rubber band and let it sit somewhere warm and out of direct light for 7 to 10 days.
Start tasting around day 7 using a straw to sample without disturbing the SCOBY. It should taste tangy with a light sweetness still coming through. The longer it sits, the more vinegar-forward it gets.
First Fermentation Tips
- In this step, unlike in the making of the SCOBY, you can use other teas besides black. Feel free to experiment with green, white, oolong, or combinations of them. Fruit teas should be mixed with a few black tea bags to ensure the SCOBY mama gets what she needs to thrive.
- Once the SCOBY gets to be about an inch thick, peel off a few layers to create a second SCOBY (you can share the love and gift this to a friend!)

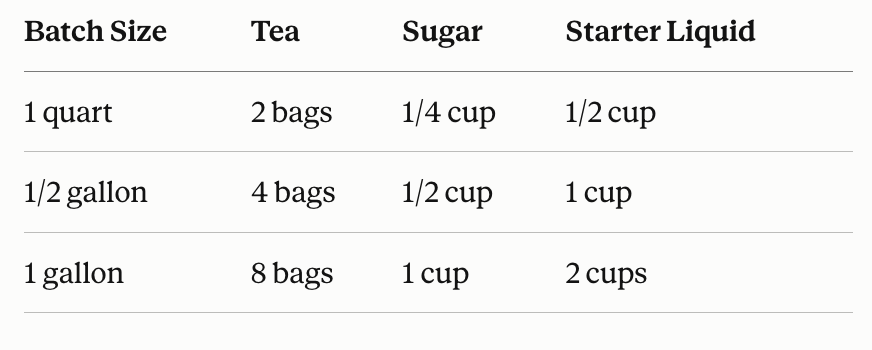
Tea-to-Sugar Ratio
For every gallon of kombucha, use 8 bags of black or green tea (or about 2 tablespoons loose leaf) and 1 cup of sugar. The sugar isn’t for sweetness in the final drink, it’s food for the SCOBY, and most of it gets consumed by the end of the first ferment.
Step 3: The Second Fermentation
Once the first ferment tastes right, remove the SCOBY and set it aside in its hotel. Pour the kombucha into bottles, leaving about an inch of headspace, and add your flavoring of choice, fruit, juice, or herbs work well. Seal the bottles and let them sit at room temperature for 2 to 3 days to build carbonation, then move them to the fridge to stop fermentation.
Open bottles slowly over a sink the first time you try a new flavor. A strong second ferment can build more pressure than you’d expect. for 3 to 10 days to build fizz, then strain out fruit if needed and refrigerate to chill and stop fermentation. Jump to recipe for printable instructions.


Second fermentation tips
- The more sugar/fruit you add, the faster the kombucha will ferment and become carbonated.
- Your jars can explode if the pressure becomes too high! For your first few batches while you’re still getting the hang of how kombucha reacts to your environment, bottle a portion of it in a plastic bottle. This will act as a gauge for how the others are doing. When the plastic bottle is rock solid, the rest are probably done. “Burp” them by opening each to release some pressure, then place them in the refrigerator to slow fermentation.
Kombucha Recipe Storage and Shelf Life
Finished kombucha (after second fermentation) keeps in the fridge for 1 to 3 months in sealed swing-top bottles. Cold temperature slows fermentation significantly, so the flavor stays stable and carbonation is preserved.
At room temperature, kombucha continues to ferment, becoming more acidic and less sweet over time. Leave bottles out only during the second fermentation process, and refrigerate as soon as they reach your desired carbonation level.
A few storage tips worth knowing:
- Always store finished kombucha in glass, not plastic. Plastic can absorb flavors and may not hold carbonation as well.
- Burp your bottles every day or two during second fermentation to release built-up pressure and prevent over-carbonation.
- If you need to pause brewing, store your SCOBY in a glass jar with starter liquid in the fridge. It can stay dormant for several weeks this way.
- The SCOBY itself will keep indefinitely as long as it stays in liquid and the environment stays clean.
Kombucha FAQs
A first ferment usually takes 7 to 10 days depending on your kitchen’s temperature, and a second ferment for carbonation adds another 2 to 3 days.
Yes, as long as your equipment is clean and your SCOBY looks and smells healthy. A tangy, vinegar-like smell is normal. Mold or an off smell means it’s time to start over.s


Homemade Kombucha Recipe (How to Brew Kombucha)

Equipment
- Glass Jar (1 gallon or larger)
- Clean Cloth (like a dish cloth or paper towels)
Ingredients
Making a SCOBY
- 7 cups water, 1.6 L
- 4 bags black tea, or 1 Tbsp loose tea
- ½ cup white sugar, 100 g
- 1 cup unflavored kombucha, this should be unpasteurized, unflavored store-bought kombucha, 235 mL
First Fermentation
- 14 cups water, 3.5 quarts, 3.3 L
- 8 bags black or green tea, or 2 Tbsp loose leaf
- 1 cup white sugar, 200 g
- 2 cups unflavored kombucha, from a previous batch or store-bought kombucha, 470 mL
- 1 SCOBY
Second Fermentation
- Kombucha, from the first fermentation
- Sweetener or flavor
Instructions
Making Kombucha SCOBY
- Make Tea: Bring 7 cups water to a boil in a clean pot. Remove from heat and add 4 bags black tea. Allow tea to steep for about 15 minutes. Remove tea and stir in ½ cup white sugar. Let tea cool to room temperature.Alternatively, boil only 2 cups of water and add the remaining 5 cups of cold water once the tea has steeped and sugar has been added. This will quicken the process.

- Add Starter: Add 1 cup unflavored kombucha then pour everything into a large glass jar.

- Ferment: Cover with a clean cloth and secure with a rubber band. Set somewhere dark and room temperature (70-75°F, 21-24°C) for 1 to 4 weeks, until a ¼ inch (½ cm) SCOBY has formed.

First Fermentation
- Make Tea: Bring 14 cups water to a boil in a clean pot. Remove from heat and add 8 bags black or green tea. Allow tea to steep for about 15 minutes. Remove tea and stir in 1 cup white sugar. Let tea cool to room temperature.Alternatively to quicken this up, boil only 4 cups of water and add the remaining 10 cups of cold water once tea has steeped and sugar has been added.
- Combine With Starter + SCOBY: If your SCOBY is still in the jar you made it in, use a clean spoon to push it down into the tea, then pour out all but 2 cups of the tea that’s in that jar (you can bottle the remaining tea to keep as a strong starter kombucha). Pour in your freshly made cooled tea.

- Ferment: Cover with a clean cloth and secure with a rubber band. Set somewhere dark and room temperature (70-75°F, 21-24°C) for anywhere from 6 to 10 days. Begin tasting the tea at about 6 days. It should be mildly sweet and slightly vinegary when finished.The longer the tea ferments, the more sugar molecules will be eaten up, the less sweet it will be. This process will go faster if it is warm in your house.

- And Repeat: Reserve 2 cups from this batch to use as starter kombucha for your next batch (just leave it in the jar with the SCOBY). The rest can move into the second fermentation!

Second Fermentation
- Flavor: Add your desired flavors to each bottle, then funnel kombucha into bottles, leaving about 1 inch at the top. Seal each shut.

- Ferment: Let ferment somewhere dark and room temperature for 3 to 10 days.This process will go faster if it is warm in your house. Carefully open bottles to prevent volcanoes. You can do this over a bowl with a baggie over the top just in case!

- Serve: If desired, strain out flavorings before serving. Place bottles in the fridge to slow the carbonation process and to chill before serving.

Nutrition
Nutrition information is calculated by Sarah Bond, degreed nutritionist, and should be taken as an estimate. For the most accurate nutritional information, calculate it using the actual ingredients in your recipe.
 did you make this?Leave a comment below and tag @liveeatlearn on social media! I love seeing what you’ve made!
More Favorites from Live Eat Learn
About the gear
Above is a list of the supplies needed to make kombucha. These are affiliate links, meaning I may earn a commission if you make a purchase. I’ve only included products I know and trust, and have included multiple buying options for each. I personally use and love the products from Kombucha.com. For 10% off their online store, comment below and I’ll get our secret code to you!


Thank you for your blog. Regarding Room Temperature…. is this a certain degree? If my house is 70 then do I wait until this point to add my scoby. I was doing this and adding it when temp got to about 100 which was nice to touch my wrist against… but I am just wondering about the actuality of this.
I would wait for it to go a bit under 100, probably closer to 80. You can always make the hot tea extra strong, then dilute with cold water to bring it to temperature faster.
My second question is I use gallon jars. I fill them half way with boiling water to steep the tea and dissolve the sugar. Can I add cold water to hurry the cool down period once the tea has brewed for a while?
Looks like you read my mind! Yep, you can do that 😀
Would you be able to write out directions for how to “recycle” the first fermentation so I can continue to use it over and over?
Hi Kim! By nature this is how the process works. You might check out the diagram I created here to get a good understanding of it. Let me know if I can clarify!
Thank you for the great, easy to follow, recipe for making kombucha. This is my first time trying this and I am in the 1st fermentations phase. I started a week ago. It looks like there is a little bit of mold growing. What should I do?
Hi Heather! Pop a photo in our Facebook group to make sure that it is indeed mold. If it is, you’ll just need to toss out everything (SCOBY included) and wash your gear in boiling water to remove all traces of the mold.
I’m a SCOBY-growing machine! LOL
But I’m wondering if I’ve missed a step? I’ve got some ‘buch in flip-top bottles for the 2nd fermentation and I don’t see bubbles, but I do see tiny SCOBY’s growing at the top of each bottle. It’s been 4 days… is this a good thing?? (All I added was honey… this is my first time, so I didn’t want to get too crazy!)
Also, when I did the first fermentation, I ended up with a 2nd SCOBY. The big mama floated to the bottom and a new one formed at the top. After I poured some into my bottles, I added more tea to what was left for my SCOBYs to float in… now there’s a brain-like formation. Does all this sound normal?? Thanks! 🙂
It’s totally normal for baby SCOBYs to form, both in 1F and 2F. Here are some tips to fix your carbonation issues!
Can I use 1/2 white sugar & half coconut sugar?
I would avoid coconut sugar for kombucha. Here are some sugars I would use instead.
I just bottled some kombucha – the 2nd fermentation and I added some blueberries to some and some cranberry orange to another. This is my first try so I used mason jars with a screw on plastic lid…tightly screwed. Can you advise me the best way to burp, It would probably be best to get those swing top bottles but I wanted to do something so I tried the mason jars. SHould I burp daily. Will I see some fizz inside so that I know it needs to be burped?
Just try burping one after 2 days and see what carbonation level it’s at. If it fizzes up, then the others could also using burping as well. Unfortunately there’s not a great way to see if it’s ready until you open it!
Hi Sarah! I apologize if you’ve already answered my question 80 times in the past, but I didn’t see it in recent history. In March I successfully made a new SCOBY per your instructions (yay!) and my third batch is currently in first fermentation. The first batch I barely drank because it was just too sweet, the second batch was also sweet but significantly better than the first, and my third batch has been fermenting now for almost 3 weeks and is still too sweet to move along to second fermentation. So my question is… is it normal for newly-grown SCOBYs to be slow to ferment a gallon of tea? Will the process likely speed up as my SCOBY matures? Or is there more likely something environmental that is slowing the process? My house temperature is usually low to mid 70s, and I follow your directions to a T, except I just realized I shouldn’t be using cane sugar. Will use white sugar next time for sure! Oops! Thanks for any guidance you can offer!
Hi Abigail! It can be a number of factors, but a cooler environment and/or weaker starter are usually the reasons. As your kombucha cultures a bit more it will start fermenting faster, and the different sugar should help as well. If it’s ever too sweet though, just let it keep going. In time it will become tart!
Hi Sarah– Thank you for this info-packed site! Very clear instructions. 🙂
Here’s my question: I was gifted a scoby from a friend and mistakenly left too close to our countertop compost container. The scoby was in a baggie (with the top open a little) and I discovered a small fruit fly in it. 🙁
I looked carefully & there was only one of them. I went ahead with my batch but now I’m wondering if I should toss it, get (or grow) a new scoby, & begin again. Thoughts?
Hi Marty! It’s really up to you if you decide to keep or toss this batch. I wrote a bit on fruit flies in kombucha here.
HI there, I am new to brewing kombucha. I bought someone else’s ongoing kombucha experiment because we are missionaries in Guatemala and my friend moved back to the states so I inherited her already-going-brew. Not sure how to pick up where she left off….Any suggestions? The large glass jug with the spigot looks to have at least 4 scobies and is only half full….Which fermentation stage should I begin with in your instructions? Kombucha is expensive here so I’m hoping to get my brew up and running soon! Thanks in advance!
Hi AmyJo! You would just start with the first fermentation. Save 2 cups of the liquid in that jug and use that as the unflavored starter kombucha 😀