
This post contains affiliate links.

For an extra dash of flavor on your tacos, nachos, and salads, add some pickled jalapeños! This quick pickled jalapeños recipe requires just 5 minutes of hands-on prep time and is a great way to level up your meals.
Serve them on chickpea tacos or tacos with ground tempeh “meat”. Also great as a garnish on vegetarian chili!
Have you ever been to a Mexican restaurant where they topped your tacos, enchiladas, or nachos with some “cooked” jalapeños? They were probably pickled! Taqueria-style jalapeños bring about a whole new world of flavor (and they taste pretty damn delicious).
On top of tasting delicious, this recipe is very simple to whip together and only requires 5 main ingredients consisting of water, sugar, salt, vinegar, and jalapeños. Add your favorite spices, and you’re good to go.
Reader rating
“Super quick and easy! I added some spices and the family couldn’t get enough.” —Nick

Key Ingredients
These pickled jalapeños require just five main ingredients. There are a handful of options that you can choose from to personalize the flavor of your peppers in the recipe card!
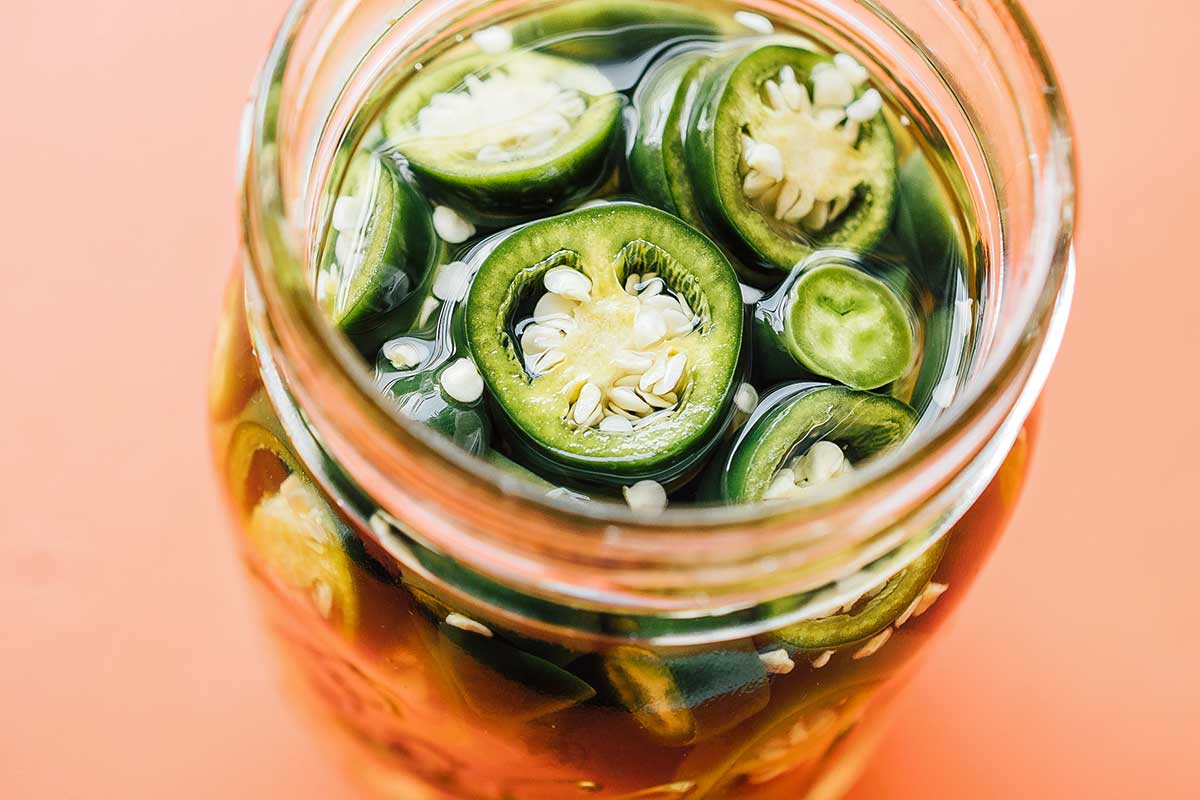
- Jalapeños: You’ll need about 10-15 peppers (I like to buy these at a mercado, like Lowe’s Mercado, where they’re often cheaper).
- Non-Iodized Salt: Keeps the brine clear and the flavor clean. Table salt can cloud the jar and taste metallic.
- Hot Water: Using hot water ensures the sugar and salt will dissolve quickly.
- Sugar: As with most pickled foods, we need a dash of sugar for flavoring.
- White Vinegar: Gives that signature clean tang. We tried white wine vinegar too, but it mellowed the bite–great if you want a gentler finish.

Adjust the spice
I know what you’re wondering. Are pickled jalapeños spicy? Well…they are if you leave in all of the seeds! However, a great way to get the delicious jalapeño flavor without the heat is to simply remove some of the seeds. The more you remove, the less spicy your pickled peppers will be.

microwavable!
To make this recipe using the microwave, you just need to heat the water until it boils. Then, proceed with the recipe as written. Easy!

Pro pickling tips
- Add other veggies like carrots, radishes, and red onions. You’ll find this combo atop signature dishes or included with chips and salsa as a dip.
- Wait 30 minutes before digging in (at least). These get better the longer they sit. We liked them after 30 minutes, loved them after a few hours, and couldn’t stop eating them by the next day.
- Double the batch. You’ll find ways to use them on everything from eggs to grain bowls to buttered toast. (Yes, we tried it. Yes, it works.)


Easy Pickled Jalapeños (Microwave Option)
Ingredients
Core Ingredients
- 1 cup hot water, 236 mL
- 2 tsp sugar
- 2 tsp non-iodized salt
- 1 cup white vinegar, 236 mL
- 10 to 15 jalapeños*, sliced
Optional Flavorings
- 2 cloves garlic, crushed
- 1 bay leaf
- Pinch cumin
- Pinch oregano
Instructions
- Liquid: Heat water in either a kettle, the microwave, or on the stove until steaming hot. Stir in sugar and salt until dissolved. Stir in vinegar.
- Jalapeños: Thinly slice the jalapeños (¼ to ⅛ inch thick), optionally removing the seeds for a less spicy pickle.
- Combine: Add your chosen optional flavors to a lidded non-reactive container (like a glass jar or ceramic vessel – I used a 16-oz mason jar), then top with jalapeños. Pour vinegar mixture over jalapeños so that they are covered (you may not need all of the liquid). Let cool to room temperature, then seal shut and transfer to the refrigerator. (Let pickle for at least 30 minutes before digging in.)
Notes
Nutrition
Nutrition information calculated by Sarah Bond, degreed nutritionist.


Super quick and easy! I added some spices and the family couldn’t get enough.
So happy to hear it, Nick – enjoy! 😀
So easy and so tasty.
Thank you
So happy to hear it, Emma! 😀
I don’t have measurements what are the measurements?
Scroll to the very bottom, here 😀
Hmmm… I have a load of extra Thai green birds eye chilli, I will give this a try. I’m curious to see how it pans out.🌶🌶🌶
Iodized salt is revolting, how can anybody eat that stuff?
It changes the flavor profile of everything in a very bad way.
The worst apple pie I ever tasted was made with iodized salt and aluminum baking powder and/or aluminum cookware. You could taste it all on the fist bite, everything but the apple !?
I could not eat apple pie for years after that horror.
There are so many good quality sea salts to choose from in the world that taste great. Just be sure you know where it comes from, you don’t want contaminated sea salt. Many sea salts actually come from salt mines way inland and those are the cleaner ones. Coastal ones, not so clean. (I found bits of blue plastic bags in a packet of Indonesian shrimp paste recently !, won’t be buying that brand again.)
Pink and White sea salts are good staples in my kitchen, black salts can be a bit funky (I avoid those, they can taste/smell like a bad river estuary.). I tried an Iranian blue salt one time, that was a very interesting flavor but I have never seen that in a store (it was a gift).
If you need iodine, eat fish more often or, eat hard concentrated liquorice sticks (looks like a black or very dark brown rock candy cane). It tastes a little bitter but that’s just the iodine you’re after). No more goitres or yucky iodized salt for us 😝
I have used a similar recipe before…It didn’t call for sugar, but I added a little to this batch! In the past I would put top on warm jar, and in about 30 minutes or so it would seal on its own! Last year I gave several jars away, and most people used the, quickly, but I found they keep VERY well in fridge for a year. I had just opened my last jar and they were great!
Will these be crunchy or no?
Yes a little bit!
can you use Apple Cider Vinegar rather than White Vinegar? I have made loads of ACV and need to use it up.. Many thanks.. Jane
Yes!